


This article was created in collaboration with Pixelverse. Thank you for supporting the partners that make SitePoint possible.

Barcodes are prevalent in almost every business that deals with physical goods. Delivery packages, device serial numbers, concert tickets, receipts, etc. all likely contain at least one barcode.
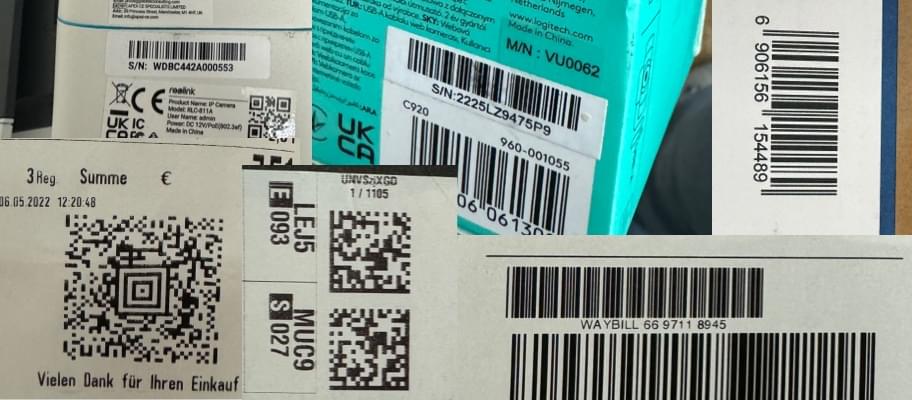
Traditionally, these barcodes have been read using specialized scanning equipment that transmits the barcode value over a cable connection or a wireless link such as Bluetooth to an application that consumes the barcode value. The scanner emulates a keyboard and transmits the characters in the barcode when virtual keys are pressed.
But these days, everyone carries a smartphone in their pocket, a powerful connected computing device with a camera. Developers can build apps with their UI tailored to their specific use case, use a camera to scan barcodes, and link it directly to data in the cloud. Examples include:
- Scan the serial number to record maintenance performed on your device
- Scan your shipment and mark it as delivered
- Process your return by scanning the barcode on the return sheet and scanning the UPC code on the returned item.
- Validate concert tickets and mark them as spent
- …etc
Initially, these apps were implemented as native apps for Android and iOS. Modern web features now allow these apps to run on the platform everyone knows: his web browser.
Introducing STRICH: Barcode Scanning for Web Apps
STRICH is a JavaScript library that provides real-time 1D/2D barcode scanning in your browser. Behind the strange-sounding name (Strrich is German for “line” or “stroke,” the building blocks of barcodes) is a lean library distributed via npm. It has no dependencies and can be easily integrated into any web app. The built-in scanning UI provides user-friendly features such as camera selection, tap to focus, and flashlight (for low-light conditions) to further accelerate development. Typescript bindings and well-maintained reference documentation are available.
All commonly used barcode types are supported.
- 1D linear barcodes such as EAN/UPC, Code 128, Code 39
- 2D matrix codes such as QR code, Data Matrix, Aztec code, PDF417, etc.
STRICH leverages technologies like WebGL and WebAssembly to do the heavy lifting of processing camera streams and deliver native-like performance in barcode search and decoding. This allows for highly efficient and reliable scanning of barcodes.
Launched in early 2023, STRICH is a relatively young product and is undergoing continuous development. Currently, the focus is on improving recognition rates of existing barcode types in difficult conditions (e.g., uneven lighting, out-of-focus codes, damaged codes), while Support for less common barcode types is also in the works.
Why barcode scanning in a web app?
Choosing a web app over a native app offers several unique benefits. This will be explained in a moment.
Simplify development by targeting a single platform
Build web apps from a single codebase instead of building natively for multiple platforms (iOS and Android, and sometimes Windows) or using hybrid frameworks like Ionic/Capacitor or Xamarin. All you need is Recently added and widely supported PWA features such as push notifications and home screen installation often eliminate the good reason to develop native apps, especially for in-house apps.
Easy distribution: you own the channel
If you’re building an app to scan barcodes, you’re likely building an in-house app.
These apps are typically only used by employees, so publishing them to Apple’s App Store or Google Play can be a pain.
- Separate distribution channels (Apple App Store/Google Play) and their respective uniqueness and associated costs
- Screenshots and other required assets in multiple resolutions and languages
- Fill out a lengthy privacy survey
- You need to provide instructions for reviewers to test your app
That last point in particular is a common hurdle. This is because these types of apps often require connections to internal backends or authentication credentials that cannot be simulated for testing. Rejected app updates, frequent manual intervention, and mysterious delays in publishing are common, not to mention the risk of business-critical apps being removed from the App Store because someone forgets to respond to an email. there is no.
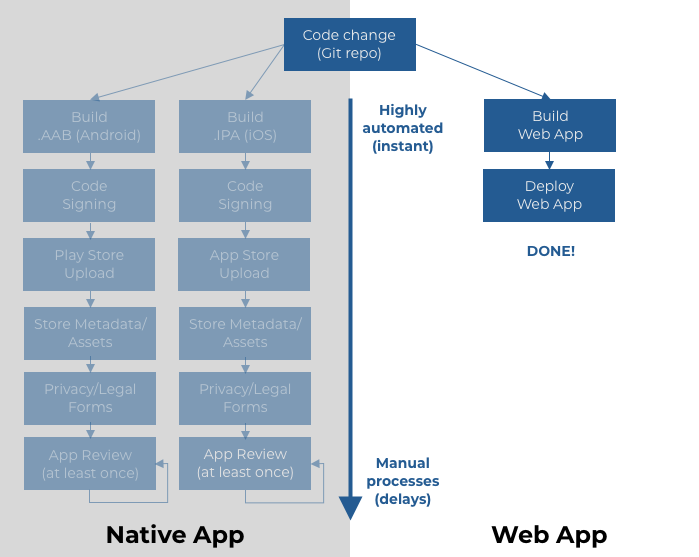
In comparison, web apps are easy to distribute and do not require specialized Android or iOS resources or personnel. Web app deployment is typically automated using CI/CD pipelines, with no user interaction or delays. Web apps are always up-to-date, there’s no review process, and you have full control over distribution channels.
app fatigue
“No apps” is also a positive, as users are tired of installing apps on their phones’ crowded home screens, especially those they don’t use on a daily basis. increasingly seen as a key differentiator.
Providing a hassle-free and comfortable browser-based experience is especially appreciated by tech-savvy people. You can also use progressive web apps (PWA) to add home screen installation and offline functionality.
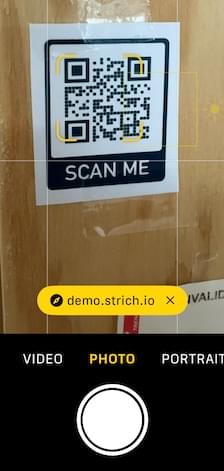
For in-house apps, displaying the QR code in a prominent place makes launching the app easier, as most people are familiar with the concept of scanning a QR code to open a website post-pandemic.
Build a scanning app with STRICH
STRICH makes it super easy to build apps that scan barcodes. To illustrate, let’s build a ticket scanner app.
Obtaining a license key
You must have a valid license key to use STRICH. To get your key, you need to create an account on the customer portal and start your free trial. Next, specify the URL where your app can be accessed and create a key.
In the example below, we’re adding three URLs: one for development, one for staging, and one for production.
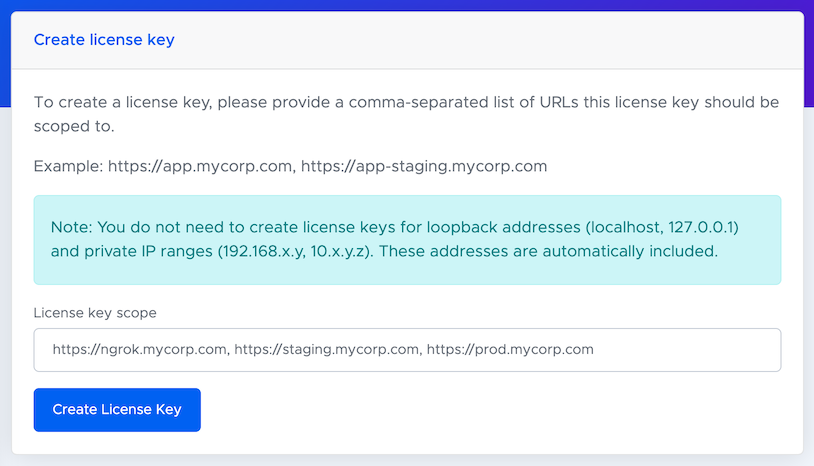
Note: Apps that require camera access must be provided from a secure context. That is, the connection must be secure (HTTPS) or via localhost. Tools like ngrok make this easy by mapping local ports to publicly accessible URLs using automatically generated TLS certificates. However, if you’re used to setting up certificates yourself, you don’t need them.
Add the SDK to your app
Once you have your app’s license key, you can proceed to install the SDK. If you’re using npm to manage your dependencies, you can use: npm install As well as other dependencies:
npm install @pixelverse/strichjs-sdk
Then, in your application’s startup code, enter the license key: StrichSDK.initialize() Method:
StrichSDK.initialize('<your license key>')
    .then(() => console.log('STRICH initialized'));
Once the Promise is resolved, you can use the SDK.
Implementing the scan use case
Now you can start implementing the actual barcode scanning flow.
In this article, we’ll build a simple ticket scanner. The app scans the ticket barcode and displays the ticket number, expiration date, and owner information. Inspecting the latter will probably require an HTTP request, but we omit it for simplicity.
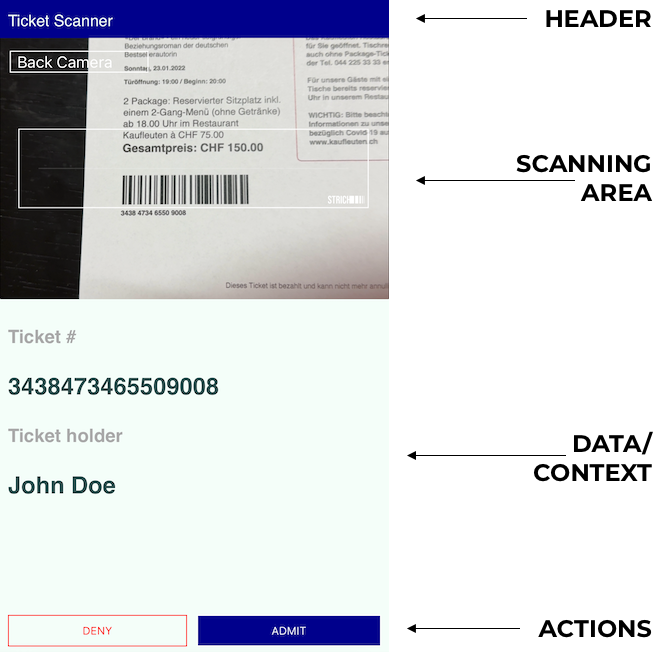
Layout selection
Most scanning apps have a split-screen layout, with a camera preview at the top and process context, results display, and actions at the bottom. Our ticket scanning app employs a layout consisting of the following elements:
-
header:Displays the title for guidance.
-
scan area: Where the camera feed will be displayed.
-
data: Scanned ticket number and owner’s name and age, which may have been obtained from the service.
-
action: A series of actions to perform after scanning a ticket. Actions should be placed at the bottom of the screen for easy thumb access.
Once the layout is in place, you can start assembling the HTML, CSS, and JavaScript.
The HTML for the app is shown below. I omitted the styling because it wasn’t very interesting. The complete source code for this example is available on GitHub.
<html lang="en">
<head>
    <title>Ticket Scanner Example</title>
    <meta name="viewport" content="width=device-width, initial-scale=1.0, maximum-scale=1.0, user-scalable=no">
    <style>

    </style>
</head>
<body>
<main>
    <header>Ticket Scanner</header>
    <section id="scanner">

    </section>
    <section id="results">
        <h3>Ticket #</h3>
        <p id="ticket_number">
            -
        </p>

        <h3>Ticket holder</h3>
        <p id="ticket_holder">
            -
        </p>
    </section>
    <section class="actions">
        <button id="deny_button">DENY</button>
        <button id="admit_button">ADMIT</button>
    </section>
</main>

<script type="module">
   <!-- see next chapter -->
</script>
</body>
</html>
Barcode reader settings
Let’s write some JavaScript to connect the barcode reader to HTML. The ID value for the element hosting the barcode reader is: scannercan now be referenced through CSS selectors. #scanner. Assuming your ticket has a Code 128 barcode (the most common type, excluding EAN/UPC codes used in retail), BarcodeReader as follows:
let theBarcodeReader = null;

function initializeBarcodeReader() {
    let configuration = {
        selector: '#scanner',
        engine: {
            symbologies: ['code128']
        }
    };
    new BarcodeReader(configuration).initialize()
        .then(reader => {
            reader.detected = (detections) => {
                displayTicket(detections[0].data);
            };

            theBarcodeReader = reader;
            return reader.start();
        });
}
Save the newly created reference BarcodeReader Save it in a variable so you can access it later.
Handling barcode detection
When a barcode is detected, displayTicket() Displays mock data for ticket numbers and ticket holders. In a real app, you would use the Fetch API here to issue an HTTP request to retrieve data associated with the ticket from the database.
All we need to do now is display the values, pause the scan, and enable the action button. Pressing the action button clears the displayed value and resumes barcode scanning.
const admitButton = document.getElementById('admit_button');
const denyButton = document.getElementById('deny_button');
const ticketNumberLabel = document.getElementById('ticket_number');
const ticketHolderLabel = document.getElementById('ticket_holder');


function displayTicket(ticketNumber) {


    theBarcodeReader.stop();


    ticketNumberLabel.innerText = ticketNumber;
    ticketHolderLabel.innerText = 'John Doe';
    admitButton.disabled = false;
    denyButton.disabled = false;
}


function resumeScanning() {
    ticketNumberLabel.innerText = '-';
    ticketHolderLabel.innerText = '-';
    admitButton.disabled = true;
    denyButton.disabled = true;


    theBarcodeReader.start();
}


admitButton.onclick = () => {
    resumeScanning();
};
admitButton.disabled = true;
denyButton.onclick = () => {
    resumeScanning();
};
denyButton.disabled = true;
put everything together
To keep it as simple as possible, I decided to put the entire app in one HTML file and inline the CSS styles and JavaScript code into the HTML. This is certainly not the recommended method, but it helps keep the samples lean and reminds you that web app development can be this simple.
The entire single HTML file is available on GitHub.
Here’s a demo of the app in action.
conclusion
In this article, you learned how to create a simple ticket scanning app using the STRICH Barcode Scanning SDK. Web apps have significant advantages over native apps, especially for in-house apps that don’t need to be on the App Store. When you combine the latest HER web browser with a capable SDK like HER STRICH, creating user-friendly barcode scanning apps is fast, cost-effective, and fun.